
In this tutorial, I will teach you how to put some awesome animated text effects into your Forum Signatures, or any other Photoshop images! For this tutorial I am using Photoshop 7 and Imageready 7. At the end of the tutorial, you should get something similar to this:

Okay, so for Step 1, we should get out our Sig. Remember that, if you want it to look good, then you should keep it kind of simple. Remember that .gif filetypes limit your colour number to 256 colours. If you want your image to look good, then you should try to keep it simple, using as few different colours as possible. Here is what I am using:

The image on the left is a .gif file, with the limited 256 colours, and the image on the right is the .png version, which does not limit your colour range. But enough with the comparison, lets get on with it!
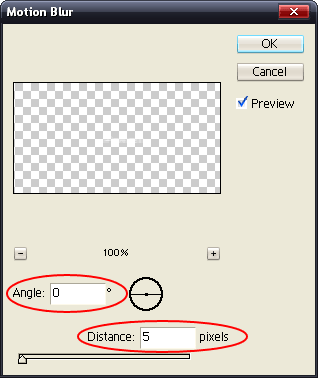
Next you should enter some text. I am simply going to type in 'fertality' into mine, but you, of course, can use whatever you want to use. Now that you've entered some text, duplicate that layer and put a motion blur on it with these settings:
Now duplicate your original text layer, place that layer above the layer you just applied a motion blur on, and then Apply another motion Blur, except this time make the Distance 10 pixels.
You can repeat doing this if you want to, it depends on how long you want the animation to last. Remember that you do not HAVE to do a Blur. You can also pixelate your text if you wanted to.
Anyway, now we need to import the image into Imageready. To do this, press Ctrl+Shift+M. And, by the way, your image should look something like this for now:

Now that you're in Imageready, it is time to start Animating the image. First of all, on your Layers box, make both of the Motion Blurred layers invisible by clicking the eye next to them on the layers box.
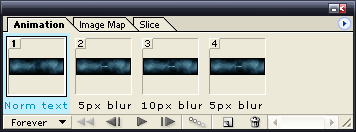
Duplicate your frame, make the plain text layer invisible, and make the 5 pixel blur layer visible. Do the same again, except for the 10 pixel blur layer. Also, for the transition back to normal text, you should create another frame for the 5 pixel blur one. If this is comfusing, here is a diagram:
Now that you've done that, put a Delay on the 'Norm Text' frame, say, about 0.5 seconds or a second.
Now click File Save Optimised As and then give it the appropriate Filename and all that jazz. Here is what your final result should look like:

Okay, so for Step 1, we should get out our Sig. Remember that, if you want it to look good, then you should keep it kind of simple. Remember that .gif filetypes limit your colour number to 256 colours. If you want your image to look good, then you should try to keep it simple, using as few different colours as possible. Here is what I am using:

The image on the left is a .gif file, with the limited 256 colours, and the image on the right is the .png version, which does not limit your colour range. But enough with the comparison, lets get on with it!
Next you should enter some text. I am simply going to type in 'fertality' into mine, but you, of course, can use whatever you want to use. Now that you've entered some text, duplicate that layer and put a motion blur on it with these settings:

Now duplicate your original text layer, place that layer above the layer you just applied a motion blur on, and then Apply another motion Blur, except this time make the Distance 10 pixels.
You can repeat doing this if you want to, it depends on how long you want the animation to last. Remember that you do not HAVE to do a Blur. You can also pixelate your text if you wanted to.
Anyway, now we need to import the image into Imageready. To do this, press Ctrl+Shift+M. And, by the way, your image should look something like this for now:

Now that you're in Imageready, it is time to start Animating the image. First of all, on your Layers box, make both of the Motion Blurred layers invisible by clicking the eye next to them on the layers box.
Duplicate your frame, make the plain text layer invisible, and make the 5 pixel blur layer visible. Do the same again, except for the 10 pixel blur layer. Also, for the transition back to normal text, you should create another frame for the 5 pixel blur one. If this is comfusing, here is a diagram:

Now that you've done that, put a Delay on the 'Norm Text' frame, say, about 0.5 seconds or a second.
Now click File Save Optimised As and then give it the appropriate Filename and all that jazz. Here is what your final result should look like:

Post a Comment